How to run NodeJS (...and many others) inside your Android app
Thu, Jul 1, 2021 •8 min read
It may not be the most essential thing in mobile development, but sometimes you get to the point where there is no option but to do something unusual in order to make your project as awesome as you want it to be. In my case it was all about running software written in NodeJS as a Java process from my app’s service.
Sample repository is available at https://github.com/siepra/node-on-android-demo
Where do we start?
Android is basically Linux. This means that we can execute ELF (Executable and Linkable Format) files which can represent products of a compiler like object code or shared libraries. But why is it important for us? Well, because thanks to that, we’re able to execute any binary which we can build for desired ABI.
Let’s build some packages
Find a proper tool
Termux comes in handy here. Termux is an open source project that emulates a terminal and provides a Linux environment on Android. But the most important thing in our case is that it allows us to build a variety of packages like, among many others Git, Tor, Python and well… NodeJS. In order to prepare a working binary, we have to clone the termux-packages repository from https://github.com/termux/termux-packages and configure it to fit your needs.
Set up the environment
Termux provides a Docker container with a build environment which is the easiest and fastest way to start building packages. Inside the container we can find a file structure that mimics a real Android environment. Some packages may want to make use of the system libraries. By default, they’ll be linked within the app package directory as that’s exactly where they are during the build. But when installed on user devices, they won’t be there. Instead, when trying to check that path the app will get a “file not found” response and will start looking for them within the system. We should keep in mind that the app is limited in accessing files on the device, only to its own files and system libraries. If the app tries to search for dependencies in the other’s app directory, which it is not permitted to access, it will get a “permission denied” and throw an error. To remedy this, we should ensure that during the build, all the paths will be the same as on the final Android device.
Under the termux-packages/scripts folder you’ll find the properties.sh file. TERMUX_APP_PACKAGE var should be changed to fit our app package name. In this example it will be com.myapp. After that, you can run the container. With Docker installed and running, the only thing to do is to run the following command from inside the termux-packages directory.
./scripts/run-docker.sh The next step is to rename the root data directory. Navigate up within docker files with
cd /data/dataThen change the com.termux directory name to the one you setted up in properties.sh.
mv com.termux com.myappBuild libnode.so for your app
Now you’re ready to build packages! Come back to /home/builder/termux-packages and run build command with proper attributes (the wiki page about building packages can be found here https://github.com/termux/termux-packages/wiki/Building-packages)
I’ll build arm64-v8a NodeJS for purpose of this tutorial
./build-package.sh nodejs -a aarch64Here comes the moment to get some coffee or take a walk as we have to wait for the package to build.
After some time you’ll be ready to get our freshly compiled .so file with all its dependencies. By default, generated files can be found under the debs folder. You can also find them inside container’s files at /data/data/com.myapp/files/.
Get corresponding files
Besides package binary we also need to take care of its dependencies. They should also be present inside debs, but the easiest way is to copy them directly from the place where they were generated during the package build process. That will additionally assure us that there will be no linking problem at runtime after we execute the desired package. In order to copy anything from docker container to the local file system we need to check out container id with docker ps command and then use it with the following pattern
docker cp <container-id>:<src-path> <local-dest-path>which, in our case src-path is /data/data/com.myapp/files/usr/lib and is the directory where all the dependencies for our package are stored.
Leap into app source
Implement native libs into project
Now that we have all we need to get on with it, there’s time to integrate those freshly generated binaries (which from this time we’ll be calling native libs) into our app.
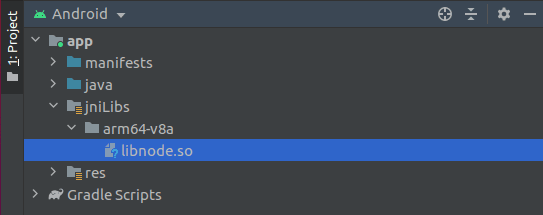
Starting from Android 10, files residing in the app home directory can no longer be executed. Executable must be placed inside the jniLibs folder. Android studio will do it for us if we add following lines in the build.gradle file.
android {
    sourceSets {
        main {
            jniLibs.srcDirs = ['libs']
        }
    }
}
Additionally, we can add directories for specific abis and handle a situation where someone is trying to run a program on a device having an unsupported architecture.
Binary file must be placed inside that folder with lib prefix and .so extension.
We should also add the following line to the application tag in the manifest file...
android:extractNativeLibs="true"...and point libs as gradle dependencies.
implementation fileTree(dir: "libs", include: ['*.so'])Prepare linked libraries
Let’s take care of the libraries that the desired package is going to use. Ultimately you’ll probably want to download them through the web at initial run of the application as they may occupy a lot of space and make your app heavy which serves as a great disadvantage if you want to share your product via Google Play. But to simplify things a little bit, for this example we’ll just treat them as regular assets (note that they won’t be executed but read, so they don’t need to be treated as jniLibs).
Create assets folder under app/src/main and place there libraries previously copied from docker container, packed into .zip archive (again it would be great if we divide them into proper abis).
As we need to pass the LD_LIBRARY_PATH environment variable to the process, we have to get the absolute path to the accessible folder containing required dependencies. The contents of project's assets folder are packaged in the APK file and it’s entries can be accessed only through input streams with the help of AssetManager. Because of that, we must copy them into the app’s files directory which will be available for us on runtime.
We need to add Apache Commons IO as a dependency in module build.gradle first.
implementation group: 'commons-io', name: 'commons-io', version: '2.6'Then we’ll create a utility class for unpacking our assets. We’ll pass context and path to assets we want to unpack, as it’s parameters. Then, we shall implement methods for copying entries extracted from the .apk file and write them inside an accessible folder.
class AssetsInstaller(private val context: Context, private val assetPath: String) {

    fun installAssets(assetInstallDirectory: File) {
        // Prepare installation folder
        assetInstallDirectory.mkdirs()

        val apk = ZipFile(context.applicationInfo.sourceDir)

        apk.entries()
            .toList()
            .filter {
                // Get all entries from matching directory
                val dirs = it.name.split("/")
                val path = assetPath.split("/")

                var match = true
                path.mapIndexed { i, p ->
                    try {
                        if(p != dirs[i]) match = false
                    } catch (e: IndexOutOfBoundsException) {
                        // Entry path is shorter than desired file location
                        match = false
                    }

                }
                match
            }
            .map {
                // Copy file to accessible destination
                val entry = apk.getEntry(it.name)
                    ?: throw Exception("Unable to find file in apk:${it.name}")

                val tempFile = File.createTempFile("tempFile", "zip")
                val tempOut = FileOutputStream(tempFile)

                IOUtils.copy(
                    apk.getInputStream(entry),
                    tempOut
                )

                val archive = ZipFile(tempFile)

                archive.use { archive ->
                    archive.entries()
                        .toList()
                        .map { childEntry ->
                            val target = File(assetInstallDirectory, childEntry.name)

                            if(!target.exists()) {
                                // Keep original archive hierarchy
                                target.parentFile?.mkdirs()

                                if(!childEntry.isDirectory) {
                                    writeEntryFile(
                                        archive = archive,
                                        childEntry = childEntry,
                                        target = target
                                    )
                                }
                            }
                        }
                }
            }
    }

    private fun writeEntryFile(archive: ZipFile, childEntry: ZipEntry, target: File) {
        val stream = archive.getInputStream(childEntry)
        val out: OutputStream = FileOutputStream(target)
        val buf = ByteArray(4096)
        var len: Int

        while (stream.read(buf).also { len = it } > 0) {
            Thread.yield()
            out.write(buf, 0, len)
        }

        out.close()
        // Allow the file to be read by native lib
        target.setReadable(true)
        stream?.close()
    }
}
Now we can use it in the MainActivity onCreate()
{{codeSnippet,node-js10}}
Run node service
Finally it is time to create a service for running NodeJS. Its process should run in the background thread.
Prepare a command as an array. I created a simple index.js file that prints a string to the console and I put it in the assets just like we did with libraries. nodeAppPath is the absolute path to this file. Of course, instead you can use any parameter that is supported by the program, e.g. -h or -v.
{{codeSnippet,node-js 11}}
Create a process builder with spreaded command as a parameter. We’ll also pass an absolute path to the folder containing assets unpacked in the previous steps, as LD_LIBRARY_PATH environment variable. It must be the same path that was provided to the installAssets method.
{{codeSnippet,node-js12}}
Now we can start the process. We have to run it in the directory containing the NodeJS binary
{{codeSnippet,node-js13}}
Last but not least we can get output and see what the process returns
{{codeSnippet,node-js14}}
In logcat we can see the result of our program
{{codeSnippet,node-js15}}
That’s it
As you can see, Termux with its ability to build packages for Android is a powerful tool you can use for various scenarios. It sometimes comes in handy to use ready-made software written in not natively supported technology, instead of spending time on re-developing the same thing in different language.
It was really fun to get all the things mentioned above to work. I hope someone will find this article useful and reap the benefits of how nice it is to work with native libraries on mobile.
Special thanks to Marek Kowalski for his guidance, and Emilia Marczyk for encouraging me to write this article.
Recent posts